Tuesday, June 13, 2017

Iris Folding Car Card

Howdy,

The cook at my work has decided to retire this year. When I asked her what her plans are for retirement, she told me that she plans to do more travelling with her husband, most likely to more casinos. I saw an iris folding car with suitcases on Pinterest and decided that would fit well with a casino as the background.

This is the result:


The card size is 5X7 inches. I cut the car imagine out with my Silhouette Cameo and printed out the iris folding design. I used purple and red paper for the suitcases, black paper for the tires, gray paper that I inked up with distress ink for the bumpers, and blue paper (her favorite color) for the whole of the car. I cut little black strips to go over the suitcases and a black rear windshield. The headlights are cut from red paper. I completed the iris folding by following the pattern on the print out I mentioned earlier. The road and brown sandy areas I cut by hand. I printed out an image that I found on google for the background. I wanted it to look as if the car is driving to Las Vegas. I cut the image to fit around the car and pasted all of the pieces onto the card. I used my Sketch Pens to write the Happy Retirement and my Cameo to cut out the blue oval. I adhered the oval onto a piece of foam to make it pop a little.

On the inside:


Good Luck! Written with my Sketch pens on a white oval and then pasted onto a blue oval.


I am entering these challenges:
Tiddly Inks Challenge - Make It Rectangle
Lemon Shortbread - Anything Goes
Mixed Media Monthly - #27 Travel

Thanks for checking out my card!

Enjoy!

~Hazel

Friday, June 9, 2017

Purple Flower Card

Hey all,

There is a sub at my work that has been working in our kitchen getting breakfast and lunch ready for us. She is a wonderful lady. She is leaving us because they have hired a person for the position. My co-workers and I wanted to thank her for all her work.

I made her this thank you card:


To make this card, I cut a 5.5 inch by 4.25 inch dark purple rectangle to cover the front of a pre-made base, a 5.25 inch by 4 inch light purple rectangle, and a 1.5 inch by 4 inch dark purple strip. I cut out the light purple circle and dark purple scalloped flower with my Silhouette Cameo. I embossed the light purple rectangle with a flower embossing folder I have. I attached the dark purple rectangle to the base card, the embossed light purple rectangle on top of that, added the dark purple strip near the bottom, and put a strip of decorative tape in the middle of the dark purple strip. I stamped thank you onto the circle and glued that onto the scalloped flower. I attached that to the right side of the strip.

I left the inside of the card blank so people had plenty of space to write in it.

I am entering these challenges:
More Mixed Media Challenge - Anything Goes/Purple
Moving Along With the Times - Embossing Wet and/or Dry
The Crazy Challenge - Use Flowers

Thanks for looking!

Have a good day!

~Hazel

Saturday, June 3, 2017

Motorcycle Card

Hey everyone,

My boyfriend's dad has a birthday today. He likes to drive his Indian motorcycle around this time of year. I finally purchased a motorcycle stamp so I could make him this card:


I cut a brown background and a 2 inch strip from decorative paper. I attached the decorative paper to the left side of the card. I cut the blue and white shapes with my Silhouette Cameo. I stamped the front end of the motorcycle on one white shape, the middle on another, and the back end on the third. I attached each white shape to a blue shape and then layered them on the card.

On the inside:


I stamped "Happy Birthday to You." on the same white shape as the front and layered it on a blue shape. I centered on the inside of the card.

I will be entering these challenges:
Quick Quotes - Masculine
Craft Rocket Challenges - Men/Boys
Fabrika Fantasy - Men/Boys
Mixed Media Monthly - #27 Travel


Have a fantastic day!

~Hazel

Monday, May 29, 2017

Minecraft Gatefold Card

Hey,

My nephew's birthday is coming up and he is a big fan of Minecraft (is there a 12 year-old right now that isn't?). I made him a Minecraft card last year as well so I had to do something different this year.

The card:


I saw this idea on Pinterest (there were various ideas that I looked at). I created a gatefold card with the four different aspects of Minecraft. Each the aspects is 2 inches squared. I scored the 2-inch squares at ¼ inch intervals and the turned the square and did ¼ inch intervals that are perpendicular to the first score lines. I complete the TNT first by cutting a strip of white paper and using a sharpie to write TNT. Next, I completed the pig. The eye squares are cut slightly smaller than the nose squares. Next came the Steve head. The eye squares are the same size as the pigs nose, the hair is about a half inch total, and the mouth is 2 different pieces totaling about ¾ inch. Finally, the creeper. I cut out 5 black squares that were the same size as the pigs nose squares. All of the pieces were attached and then I attached them to the doors of the card.

The inside:


I stamped Happy Birthday on the inside with a new birthday stamp that I purchased from WISH.com.

I plan to enter these challenges:
The Crazy Challenge – Birthday
The Crafter's Cafe - Birthday
Not Just Cards Challenge – One for the Boys
Bastel-Traum – Men or Boys

Have a good night!

~Hazel

Flower Birthday

Hey all,

This card is for my mom's birthday. She loves red and blue. I thought I would use my new stamps that I just recently purchased from WISH.com.

Here is the card:


I cut the light blue paper to fit a pre-made card and used a red ink to stamp on the flowers. I stamped the flowers randomly. I then used decorative scissors to cut the white bumpy paper at the bottom (I haven't used those in a long time). I cut a strip of red paper to put along the bottom as well. I punched out some dark blue butterflies and painted them with a sparkly paint that I have. I hand cut an oval and stamped Happy Birthday on it. Then, rubbed the edges of the oval with a light blue ink pad. Finally, I attached all of the pieces to the pre-made card putting a foam piece under the oval and bending the wings of the butterflies upward to make them look as if they are flying.

On the inside:


I stamped a simple birthday message on the inside of the card.

I am entering these challenges with this card:
Scrapbook Stamp Society – Anything Goes W/ Option Butterflies
The Crazy Challenge – Birthday
Rubber Dance – Rule of Three (Butterflies)
Stamping Sensations – Butterflies, Fairies, and Fantasy

The Crafter's Cafe - Birthday

Have a fantastic day!

~Hazel

Sunday, May 14, 2017

Tea Cup Flower Card

Hey everyone,

Today is Mother's Day so I made two of the same card with some variations on color and flower. One for my mom and one for my boyfriend's mom.

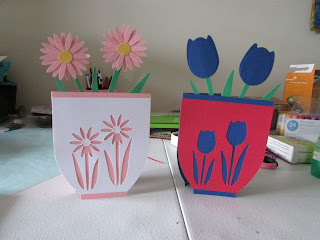
Here's the front of the cards:


I used my Silhouette Cameo to cut out all the pieces including the card bases. Then I attached the pieces with tape/glue.

Here's a closer picture of each card:


My boyfriend's mom said she likes pink and white as well as daisy's.


My mom likes blue and red and didn't have a favorite flower.

For the inside:


I added a ribbon to "tie" the flowers together and a square that says "Happy Mother's Day!" written with my Silhouette Sketch pens.

I will be entering these challenges:
Come and Get It Challenge - Mother's Day
Glitter N' Sparkle - Mother's Day
A Gem of a Challenge - Spring Fever
Crafting with Dragonflies - Lots of flowers/Mother's Day
Crafty Calendar Challenge - Flowers
Really Reasonable Ribbon - Mother's Day
Quick Quotes - Mother's Day
4 Crafty Chicks - Celebrate Women
Work It Wednesday - April Showers bring May Flowers

Thanks for looking!

~Hazel

Sunday, April 30, 2017

Flower Heart Card

Good Evening,

I have two friends from college that are getting married in a week. I thought a card with hearts would be nice. This is the card I decided to make:


I embossed the background with a balloon heart like embossing folder. I stenciled on a heart to use as a guideline for the punched out flowers. I punched out flowers in dark blue, light blue, dark purple, and light purple. I chose these colors because they are my friends favorite colors. I glued the flowers onto the heart guideline in a color pattern. I used gold stickles in the center of each flower.

Next, I stamped a frame and the word "Congratulations" into the frame. Finally, I added some decorative tape along the bottom of the card.

For the inside:


I used a simple stamp saying "Wishing you a special happiness on this special day."

I will be entering these challenges with this card:
Glitter 'N' Sparkle - Flower Power
Allsorts Challenge - Embossing
Hiding in My Craft Room - Freestyle!
A Gem of a Challenge - Embossing Wet or Dry (Dry)
Dragons Liar Designs Challenge - Anything Goes w/ twist Wedding Day
Mod Squad Challenge - Love
Tuesday Throwdown - Embossing
Time Out Challenges - Flowers (No Twist)

Have a great night!

~Hazel